Today I’ll explain and show you how to install a Japanese keyboard in 2020 on your computer or phone. I’ll provide you with the exact steps you need to take in order to get it on your Windows, Mac, Android, or iPhone.
Keep in mind that the process for adding it onto a tablet will be the same as the phone as long as they are using the same operating system.
You can hop around to the sections that you need and ignore the ones that you don’t. After each step by step guide, I’ll also give you a more detailed walk through that includes pertinent pictures of the things you need to click on so that it’s as easy as can be.
Japanese Keyboard For Windows
I have a gaming PC that uses Windows 10. I love it, and use it for basically everything. Including my Japanese studies.
The great thing about Windows is that you can activate the Japanese keyboard with a few simple steps and then begin communicating in hiragana, katakana, and kanji to your heart’s content.
Here are the steps that you need to take in order to set it up for the first time:
- Go to the search bar on your task bar
- Type in “language settings” and press enter
- Click on add a preferred language
- Select Japanese and then press next
- Click on install
Now I’m going to show you how to do this with the help of some pictures. Once I’m done with that, I’ll explain how you can switch between English and Japanese when typing.
You can either click on the windows button in the bottom left corner of your desktop to open up the menu, or just click in the search bar next to it. Then type in “language settings” in order to bring up the menu you need to click on.

This should cause the language settings option to appear right at the top of the menu and all you have to do is click on it with your mouse, or press the enter key.

This will take you from your desktop to the menu where you can add language packs for both your keyboard and computer interface.
Since this post is just about the keyboard, we will focus on only changing that. However, if you ever want to change everything into Japanese, this is the menu that you need to use in order to do so.
Since your computer comes with only English installed on it, we need to add a new one. Click on the “add a preferred language” button.

This will then pull up a menu with a list of languages. You can either scroll down until you find the one that says Japanese, or you can just type that into the search bar at the top.
I recommend using the search bar as it makes things a lot faster. Once you’ve done that, click on the Japanese option and then press the next button at the bottom.

Then all you have to do is press the install button and your computer will download the language pack that it needs in order to start using Japanese characters.
I recommend that you leave all of the pre-selected options as they are, unless you want to change your entire computer into Japanese. If that’s the case, this is where you can check that box.
Once the new information is downloaded and installed, you should notice that there is a ENG over on the bottom right side of your task bar.
This is your current keyboard’s language. ENG stands for English and you can either click on it to switch to Japanese or press shift + alt.
Once you have done that you should see two new icons. One of them will be an A and the other is a box with a circle and a J inside of it.
This means that you are in the Japanese keyboard, but you’re still typing in the Latin Alphabet that we use in English.
To switch it to kana where you can type in Japanese you need to either click on the A which should change it to an あ or you can press alt + ~ and it will flip over for you.
Once you’ve done that, you can now type in Japanese.
The basic rule is to type as if you were spelling the word in romaji and it should convert it into kanji and kana.
Japanese Keyboard For Mac
I’ve had a MacBook Air for a long time now, and the cool thing is that there are a lot of really nice features that Macs come with for Japanese language learners like a pitch accent dictionary.
Of course today’s topic is on adding a Japanese keyboard, so let’s take a look at how you can do that.
- Click on system preferences
- Click on language & region
- Click on the + symbol at the bottom of the preferred languages box
- Type in “Japanese” select it, then click on the add button
When you do this, a popup will ask you if you want to change your entire computer’s interface into Japanese or keep it in English.
Unless you are ready for a full immersion experience, I would recommend keeping your computer’s primary language in English.
It will then take you to a screen where you can add a new input source. It should have Japanese selected automatically, so all you have to do is press the add input source button on the bottom right corner.
Let me show you these steps with pictures next, and then I will talk a little about how you can change between English and Japanese when typing on your Mac.
First you have to click on your Mac’s system preferences.

Then you can select the language and region section where the Japanese options are located.

This then takes you to the place where you can add as many languages as you would like. Since we’re focusing on Japanese, I’ll limit my explanation to that.
Be sure to click on the + symbol in the bottom left corner so that you can add a new keyboard.

At this point you will be presented with all of the available languages. That being said, the cursor should automatically be in the search bar, so all you have to do is type in “Japanese” and that should bring you the correct option.
You then click on the Japanese choice and then press the add button.

Like I mentioned before, it will then ask you if you want to change your entire interface into Japanese or keep it in English. That choice is entirely up to you.
Once you’ve made your decision, it will then ask you which input sources to add, but it should only have one option that is already selected. Since it’s Japanese, you can just click on the add input course button at the bottom right.
At this point you are good to go!
There are two ways that you can switch between using an English keyboard and a Japanese one. The first way is to click on the flag that is in the top bar of your screen (by the clock, battery percentage, etc) and select the “Hiragana” option.
For me, it’s an American flag since I’m an American, but I would guess that if you’re located somewhere else in the world that it will probably use your nation’s flag.
The other way to switch between languages is to use a hotkey. For the Mac it is control + space bar.
However, you have to make sure that it’s set up first. Here’s how you do that:
- Click on system preferences
- Click on keyboard
- Click on shortcuts
- Click on input sources
- Check the box for “select the previous input source”
Now it should work for you.

Once you are using the Japanese keyboard, typing is fairly simple. All you have to do is type as if you were spelling things using romaji, and it should automatically convert it to the appropriate kana and kanji.
Japanese Keyboard For Android
I’ve had a lot of different phones over the years. All the way from brick phones, to flip phones, to the wonderful smart phones that we use nowadays.
My first smartphone ever was an iPhone 4s, but I’m currently using Google’s Pixel 3.
So let’s talk about how to activate a Japanese keyboard when you’re using an Android powered device. Here are the steps you need to take:
- Go into the settings app
- Scroll down and select system
- Choose languages & input
- Click on languages at the very top
- Click on the add a language option
- Go to the bottom and select 日本語
Once you have completed all of the above steps, you will have added Japanese as a language option to you phone for whenever you want to start typing.
The way that you switch between the English keyboard and the Japanese keyboard is super simple. You just have to click on the button that looks like a world (right next to the space bar) whenever your keyboard pops up.
Not sure what that world symbol looks like? Check it out in the below pictures.
Now that you’ve got the bare-bones explanation on how to turn it on, let me switch over to the more detailed version and show you some pictures that illustrate which things to press.
Alright, so first things first: open up the part of your phone that stores all of your apps. You’re going to want to scroll down until you find the settings.

Then it will of course open up all of the different ways that you can customize your phone. You just want to get to the part where you can set up additional languages.

Once you click on that bad boy, you will be taken to a place where you can change things like the languages you phone uses, gestures that activate certain functions (such as squeeze for your assistant), date and time, and others.
We just want to stay focused on getting the Japanese keyboard turned on, so click on the picture that you see in this next part.

You see that world symbol on the left? Keep that shape in mind because it’s going to be the button that you press to switch between English and Japanese keyboards when you’re texting and such.
For now, be sure to click on it so that you can get into the next section which will take us to the fourth part of this process.
Now we need to go into the languages section of you phone.

For whatever reason, the button you need to press in step 4 (above) looks a lot more like a header than an actual button. Go ahead and click on it anyway.
In my opinion, the things below it like the virtual keyboard and the physical keyboard options look more like clickable items, but just ignore them for now and instead press on the topmost item.
For step #5 I don’t actually have a picture for you.
The reason is because this particular step doesn’t really require a picture because all you should see is the following:
- 1 English (United States)
- + Add a language
I suppose if you’re from another part of the world than myself, you will see something different in the #1 section, but that doesn’t really matter because all you need to do is click on the + Add a language part.
Once you click on that you will see a huge list of languages. Since the languages are alphabetized, you will need to scroll to the bottom where you start seeing Asian characters.
Click on the option that looks like 日本語
The word 日本語 in case you were wondering is the Japanese word for “the Japanese language” and is pronounced nihongo.
I guess Android assumes that it you want to activate a Japanese keyboard then you already know how to read it.
Once you’ve clicked on that, it should be loaded into your phone and you can start using it to text in Japanese.
Japanese Keyboard For iPhone
I’ve had quite a few iPhones in my day. The first one I ever got was the iPhone 4s, but the next two that I owned were the 6s and the 7 Plus.
I enjoyed my iPhones, but I’m currently tying out a Pixel 3 (don’t kill me!).
Regardless, I own an iPad that runs on the same operating system (the iOS) and the process for activating a Japanese keyboard is identical.
Here are the steps you need to take:
- Launch the settings app
- Click on general
- Click on keyboard
- At the top should be a “keyboards (1)” option. Click on it
- Press the add new keyboard option
- Scroll down until you find Japanese and select it
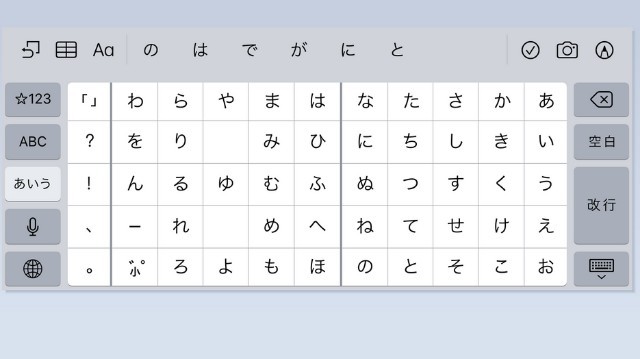
- You should see two options: kana and romaji. Choose the kana option and press done in the top right
Compared to the other devices that we’ve covered in this post, the iPhone seems like it takes the longest.
While it does have the most steps, they are all pretty quick and intuitive. Once you’ve activated the Japanese keyboard, you should see a world icon in the bottom left part of the keyboard. Click on it to switch between English and Japanese.
If you would like to see what these steps look like, here is the process one picture at a time:
First we need to click on the setting application.

Yes, I know I need to take care of those 2 messages. Apple wants me to set some stuff up, but I’m just too lazy to do it right now.
Anyway…
Once you’ve opened up the app, you need to click on your phone’s general settings.

This will take you to the part of your phone where you can change things to your liking. We need to focus on keyboards for this part

This will then take you to the part where you can change all sorts of things about your phone’s keyboard.
At the top, it tells you how many different keyboards you have active at the moment. Normally you will only have 1 of then on (English), but if you happened to turn on the emoji keyboard a while ago then it will probably say 2.
Click on it either way.

For both steps 5 and 6, inserting pictures would be redundant.
All you need to do for step 5 is to click on the words “Add new keyboard…”
For step 6 you need to scroll down to “Japanese” and then select it.
The final step actually is important, so here’s the last picture for this process. You will get the option to turn on kana, romaji, or both for you Japanese keyboard.
All you need to do is turn on the kana.

Click on “Kana” so that the blue check mark appears and the click on done in the top right corner.
Once that is complete, you are good to go!
Now you just have to press on the little world icon in the bottom left corner of your keyboard to switch between English and Japanese.

Learn How To Type In Japanese
Now you are good to go on all of your electronic devices. You’ve got your Japanese keyboards activated and you’re ready to start texting people in Japanese and everything else.
The only thing that you might still need to know is some of the tricks and tips to typing in Japanese.
If that’s something that interests you, then click here to learn how to type and text in Japanese.
Thanks!
Further Resources for Learning Japanese:
#3 Get My eBook (Secrets to Learning Japanese) for Free

またね!
I tried using this technique, but it says that it’s not ready for some reason. I’m getting desperate as I need to do a Japanese assignment
Hey Kevin, which device are you using?
Also, you can always go online to Google Translate and use their free tool to type in Japanese and then Copy/Paste it where you need it.
I love the fact that is it so easy to utilize different languages in today’s day and age.
So I do not know any Japanese or any other language for that matter. But how does utilizing that typing ability impact your ability to learn a language?
It is incredibly difficult to learn a language and one of the most important things in doing so is practicing it. Is it something that would be valuable or would it just be too difficult and not helpful? Thanks!
Hey Brad, typing and writing in your target language definitely helps you with learning it. Anything that promotes you thinking in your new language is a benefit towards your success. Plus you’ll be able to talk directly with natives over the internet! I use Twitter for this and it’s great!
Wow! I knew that you can change keyboards in Android and iPhone, but i neve knew it was possible in Windows! I always thought that it would be necessary to actually purchase a new keyboard with the new language and connect it manually. Do you have any tips on becoming comfortable with using your method in Windows without getting confused between your actual keybaord and the Japanese letters you are typing?
Hey Ben, of course! Since you will be typing the information on an English keyboard, the first tip is to know the Romaji version of the words you want to type and then type them in EXACTLY the same way.
This first tip should automatically take care of the punctuation marks like the Japanese version of commas and periods. It will also take care of the Dakuten and small tsu that appear with Hiragana.
Then when it converts to Hiragana, you can keep it in Hiragana or choose some Kanji. The second tip is to use what you know. So if you know what the correct Kanji is, then use it! But if not, then just stick with the Hiragana version.
Katakana is mainly used for loan/foreign words, so it won’t convert into any Kanji.
As a third and final tip, if you want to type from top to bottom, and right to left in a Word document, then click on Page Layout >>> Text Direction >>> Vertical.
I hope those were useful! Thanks!
Wow! I never knew it was so simple to swap my keyboard to Japanese on both my Mac and iPhone. For some delusional reason, I thought it required me to do a lot more than that.
I also appreciate that you’ve included all different types of phones and PC Systems in your instructions as there is nothing more frustrating than having to go to multiple websites to find the answer I am looking for.
I’m glad I could help! I think you used to have to download special software or an app to get a Japanese keyboard in the past, but now it comes as a standard feature. Pretty cool! (^_^)b